Pages
▼
Monday, April 29, 2013
Strawberry Limeade Cake
I have so many fun recipes to share with you this week!
I had a hard time deciding which one to share with you on this Monday morning. So I decided to start with cake.
When in doubt, eat cake.
We celebrated Big Sis's FIFTH birthday this weekend. Five. Years. Old.
When did my baby become so big? {sniff}
Her favorite colors are pink and green, so you better believe I made her a green cake. With pink icing.
This is a take on my Raspberry Lemonade Cake.
Strawberries and limes just go together! This reminds me of Sonic's strawberry limeade (which my husband loves)...it's a fun treat we get in the summer.
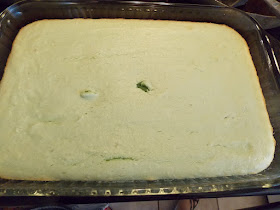
Start with the lime cake. Like the lemonade cake, it uses a frozen limeade concentrate for the lime flavor.
There's something about the sour cream and cream cheese with the cake mix that makes for the most amazing texture. It's dense and oh-so-moist. I rarely (read: never) make a cake without oil or butter, but it just works here. I'm a texture freak, and I love the texture of this cake.
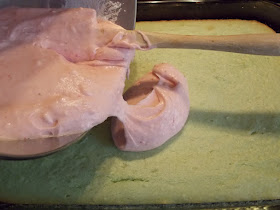
Strawberry cream cheese frosting...does it get any better?
So go make this cake!
Strawberry Limeade Cake
Cake:
6 oz. (3/4 cup) frozen limeade concentrate, thawed
18.25 oz. white cake mix
8 oz. sour cream
3 oz. cream cheese, softened to room temperature
3 large eggs
1 tsp lime extract (or vanilla extract)
5 drops green food coloring (optional; just makes a more lime-colored cake)
Icing:
8 oz. cream cheese, softened to room temperature
1/2 stick (4 T butter), softened to room temperature
1 lb. powdered sugar
1/4 cup strawberry puree (from fresh strawberries or frozen unsweetened strawberries)
1 tsp vanilla extract
In a mixer fitted with a paddle attachment, beat the cake ingredients together on medium speed for 30 seconds. Increase the speed to high and beat for another 2 minutes. Make sure you scrape the sides and bottom of the bowl to combine well.
Pour batter into a greased 9x13 baking dish. Bake in a 350 degree oven for about 30 minutes, until a toothpick comes out clean.
While the cake cools, beat together the frosting ingredients until smooth. Spread the frosting evenly on top of the cooled cake.
Thursday, April 25, 2013
Chocolate Chip Muffins (low fat. gluten free. sort of healthy.)
Thanks, Pinterest, for these muffins. Apparently they're some knock-off of a Whole Foods muffin that cost an arm and a leg. I wouldn't know. I try not to leave my house unless I absolutely have to. So a trip to Whole Foods is definitely not on my to-do list.
They're actually a pretty good way to satisfy my sweet tooth.
I was intrigued by the recipe and the pictures of the finished product. So I decided to give these muffins a whirl.
I chopped the recipe in half and made a couple of easy changes. I had to cut down on the cocoa powder (the amount called for was too bitter for me. I'm a milk chocolate girl.). I also used one whole egg instead of 3 egg whites (what the heck would I do with three leftover yolks?).
Yes, these muffins really are good. No, they do not taste like cupcakes.
But! I expected them to taste like cardboard (I'm just being honest. There's no butter. Who bakes without butter?). Alas, they do not taste like cardboard! I was genuinely surprised at how good they were.
I liked them best warm. But they were also good cold. And they were good at room temp. I'm not too picky about these.
Lastly, they were super easy to make. Make the whole batter in your food processor. Piece of cake.
I mean...piece of low-fat, gluten-free, semi-healthy...muffin.
Chocolate Chip Muffins
Adapted from Jo & Sue, who adapted it from Dashing Dish
3/4 cup plus 2 T old-fashioned oats
1/4 tsp cream of tartar
3/4 tsp baking soda
3/4 tsp baking powder
1/8 tsp kosher salt
1/3 cup sugar
3 T unsweetened cocoa powder
1 whole egg
1/4 cup unsweetened applesauce
1/4 cup fat-free Greek yogurt
1/2 cup hot water
1 tsp vanilla
Milk chocolate chips
Process oats in food processor until completely ground. Add the cream of tartar, soda, powder and salt and pulse until combined. Add the remaining ingredients (except the chocolate chips) and process until blended.
Scoop batter into muffin tins. This makes 12 muffins (about 2 1/2 T of batter per muffin). I used paper liners and sprayed them with nonstick cooking spray to make for easy removal.
Bake in a 350 degree oven for 7 minutes. Sprinkle the chocolate chips evenly on top and return to the oven for two more minutes, until cooked through.
Tuesday, April 23, 2013
Mahogany Chicken
I've had a few Pinterest busts lately. Nothing really terrible, but a few things that I just wouldn't make again.
Until last night.
This chicken. So good.
Here's the stuff for the marinade - you probably have most (if not all) of these things in the pantry/fridge.
I had to buy the apricot preserves, and that was it.
Whisk it together. I could've slurped the marinade through a straw. It was amazing!
I do love fresh ginger. There's nothing like it.
This is so easy. Just mix the marinade, marinate the chicken as long as you can, and then bake it all together.
I reserved a little marinade to pour on the chicken before serving.
And I served it with chewy brown rice and garden-fresh asparagus.
So so good. I can't wait to make it again.
Oh, and my kids scarfed this down. Baby Bear included.
Mahogany Chicken
Adapted from Menu Musings
4 boneless skinless chicken breasts
Marinade:
1/4 cup apricot preserves
2 T brown sugar
1 T dijon mustard
2 T balsamic vinegar
2 T soy sauce
1 T grated fresh ginger
1 T minced garlic (about 4 cloves)
Hot cooked rice, for serving (I used brown rice)
Whisk together the marinade ingredients. Reserve about 1/4 cup of the marinade for use later. Marinate the chicken for at least 2 hours, overnight if you can. Bake the chicken, in the marinade, for about 30-40 minutes until cooked through. Spoon the reserved 1/4 cup marinade over the top of the chicken and let it sit for about 5 minutes before serving.
Serve chicken with hot cooked rice and lots of sauce. Broccoli or asparagus is good on the side!
Saturday, April 13, 2013
Lemon Brownies
Can lemon bars be described as "fudgy"?
Or does the word "fudgy" only describe chocolate?
A Google search would probably reveal the answer.
But I'm too tired.
And since this is my blog, I'll call anything fudgy that I want to describe as fudgy.
I like the word fudgy.
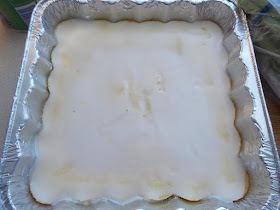
On an unrelated note, I have no idea why I baked these lemon brownies in a disposable baking dish. That is so weird that I did that.
So the bottom line is that you want these lemon bars to be fudgy. And the bottom line of that is don't overbake them.
"Don't overbake it" might be the bottom line of this blog.
Goodnight.
Lemon Brownies
Adapted from Becky Charms
1 stick butter, softened to room temperature
3/4 cup sugar
1 egg
1/4 tsp salt
Zest of 2 lemons (about 2-3 teaspoons)
2 T lemon juice
1 tsp lemon extract
3/4 cup flour
Glaze:
2 cups powdered sugar
1/4 cup lemon juice (or enough to make a thick pourable glaze)
In a mixer fitted with the paddle attachment, beat together the butter and sugar. Add the egg and incorporate. Add the salt, lemon zest, juice and extract. Mix until smooth. Add the flour and mix until just incorporated. Be sure to scrape the bottom of the bowl to fully incorporate.
Pour batter in a greased 8x8 baking dish and bake in a 350 degree oven for 20-22 minutes. Do not overbake - you want these to be "fudgy" and they will be dry if you bake too long. If you insert a toothpick, it should come out with a few crumbs sticking to it.
Whisk together the glaze ingredients and pour half on top. Cool to room temperature and pour the other half of the glaze on top. Let the glaze harden before cutting. I refrigerated mine before slicing so they would slice easier.
Tuesday, April 2, 2013
Chicken Piccata
Okay, so this probably isn't a very authentic version of chicken piccata. It's sort of a cross between chicken piccata and chicken scaloppine. But, for lack of a better name, I picked chicken piccata.
It made me feel Italian to call it that.
So you can call it whatever you want, as long as you call it. Or make it.
Whatever. It's late at night and my brain has already gone to bed but my body is sitting at the computer typing.
So what I'm telling you is that I'm not responsible for what I type. And that's the bottom line.
Start with chicken breasts, and mine were a little uneven (as are all chicken breasts) so I pounded them to a uniform thickness. You don't want them too thin - just even.
Sprinkle the chicken with salt and pepper and saute it on both sides until it's golden brown. You don't need to cook it through at this point because we're going to simmer it in the sauce in a minute.
When the chicken is golden, take it out of the pan. Add the other tablespoon of olive oil and butter and saute the mushrooms and garlic.
Sprinkle in some flour to thicken the sauce. Pour in some chicken broth and add salt and pepper. Bring it to a boil and return the chicken to the sauce.
When the chicken is cooked, it's time to add the capers, parsley, lemon juice and half-and-half.
Yum! This sauce is so delicious. Tangy from the lemon, creamy from the half-and-half and the mushrooms and capers add great texture and flavor.
When you serve, nest some pasta on the plate, place the chicken next to it, and spoon plenty of sauce on top.
Life's all about the sauce.
And everything I make these days has lemon in it. I. Can't. Get. Enough.
Chicken Piccata
Inspired by Pioneer Woman and Barefoot
1 T olive oil
4 chicken breasts, pounded to a uniform thickness
Salt & pepper
1 T olive oil
2 T butter
12 oz. mushrooms (use a mixture of white button and cremini), sliced
4 cloves garlic, minced
2 T flour
1 cup chicken stock
1 1/2 tsp salt
3/4 tsp pepper
2 T capers
2 T chopped Italian parsley
Juice from one lemon
1/2 cup half-and-half
3/4 pound angel hair pasta, cooked according to package directions
Grated parmesan cheese, for serving
Heat the olive oil in a large nonstick skillet. Sprinkle salt and pepper on both sides of chicken. Saute the chicken over medium heat until brown on each side, about 3 minutes per side. The chicken will not be cooked through. Remove it and put it on a plate.
Heat another tablespoon of olive oil with the butter in the same skillet. Saute the mushrooms and garlic for about 8 minutes, until tender. Sprinkle in the flour and stir, cooking for another minute. Stir in the chicken stock, salt and pepper. Return the chicken to the sauce and and simmer, uncovered, over medium heat for about 10 minutes, until chicken is cooked through.
Stir in the capers, parsley, lemon juice and half-and-half. Remove from the heat and serve the chicken with the pasta and plenty of mushrooms and sauce.
Monday, April 1, 2013
Chocolate Chip Cookie Cheesecake Bars
Good morning!
It's Monday, and it just seemed appropriate to begin the week with a little chocolate chip cookie cheesecake bar.
Don't you think?
These are easy. Really. Because you get to use this:
Just press about 2/3 of the dough in an 8x8 baking dish.
I love using 8x8 dishes. They're a good size.
Now beat together a little cheesecake filling. You only need an egg, one bar of cream cheese, some vanilla and sugar.
Pour it over the cookie dough.
Do you want to see a close shot?
Have I told you lately that I love vanilla bean specks. I got vanilla beans on Amazon and my life hasn't been the same since.
Now crumble the remaining cookie dough roll on top.
It won't cover the whole top, but I'm okay with that. And you should be too.
Because when it bakes...it spreads out and creates this great top...almost like a cobbler.
Please don't overbake these.
You want the cookie dough to be tender and the cheesecake filling to be creamy.
Because that's the right thing to do.
Have a great week! Make good choices. Good choices that involve chocolate, cream cheese and cookie dough. And maybe a treadmill.
See ya later.
Chocolate Chip Cookie Cheesecake Bars
Adapted from Pillsbury
16.5 oz. roll chocolate chip cookie dough (I used Pillsbury)
1 egg
8 oz. cream cheese, softened to room temperature
1 tsp vanilla bean paste (or vanilla extract)
1/2 cup sugar
Press 2/3 of the cookie dough in a greased 8x8 baking dish.
In a mixer, beat together the egg, sugar, cream cheese and vanilla until creamy. Pour over the cookie dough.
Use your fingers to crumble up the remaining cookie dough over the cheesecake filling. The cookie dough won't cover completely, and that's okay. It will spread as it bakes.
Bake in a 350 degree oven for 27-33 minutes. Do not overbake. Cool to room temperature and then refrigerate for at least 8 hours - you want them to be completely chilled when you cut them.


