Showing posts with label How to Use a Cake Mix. Show all posts

Monday, March 12, 2012

Very Strawberry Cupcakes


My baby turned two years old this week!

So I made her these cupcakes because she's my cupcake.  She loved them.  Girl doesn't get sugar very often, and you don't want to get in between her and sugar when she does get the opportunity.

Plus, she's used to being the little...and she's getting ready to be the middle.

Oh my.  Bless her heart.


So about these cupcakes.  If you like very moist, very strawberry-y, very yummy cupcakes topped with very creamy, very pink and very cream-cheesy icing, you should make these ASAP.


Here's how I did it.  I adapted it from Paula Deen's strawberry cake...very similar, but I changed a few things, like making them into cupcakes!  I know, how did I ever come up with such a great idea.


There's a couple of steps, but they're easy.  And the results are more than worth it.


Put the cake mix, gelatin, water, vegetable oil and eggs in the bowl of a mixer.

And then put the (thawed) strawberries in the food processor.


Puree them with the juice of a lemon!


And then reserve 1/4 cup of the strawberry puree, because we'll need it for the icing in a minute.


Just like that.

Now add the rest of the strawberry puree to the mixer and beat the cupcake ingredients together.


When the cake is ready, prep your cupcake tins with liners, and fill the tins about 2/3 full.


Bake them until they are perfectly moist.


Let them cool while you work on the icing.  Beat together the remaining 1/4 cup strawberry puree, cream cheese and butter.


When that is creamy, add the powdered sugar and blend again.

Now we're ready to ice!


Everyone's got at least one Spring birthday in their family.  Make someone the best birthday cupcakes ever!


Very Strawberry Cupcakes
Adapted from Paula Deen
makes about 20-24 cupcakes, depending on size

Strawberry Cupcakes:
18.5 oz. white cake mix
3 oz. box strawberry-flavored instant gelatin
1/2 cup water
3/4 cup vegetable oil
4 eggs
16 oz. container frozen strawberries in syrup, thawed and divided
Juice of a lemon
1 tsp vanilla extract

Strawberry-Cream Cheese Frosting:
8 oz. block cream cheese, at room temperature
4 T (1/2 stick) butter, at room temperature
1/4 cup strawberry puree from the 16 oz. container you used for the cupcakes
1 lb. powdered sugar
1 tsp vanilla extract

In the bowl of a food processor fitted with a steel blade, puree the strawberries with the lemon juice.  Reserve 1/4 cup of strawberry puree for the icing.

Combine the cake mix, gelatin, water, oil, eggs, vanilla and the remaining pureed strawberry mixture in the bowl of your stand mixer.  Mix on low speed for 30 seconds.  Stop and scrape the bowl, especially the bottom, well.  Beat on medium-high for two minutes.

Scoop batter into a muffin tin lined with cupcake liners.  You want to fill the cups about 2/3 full.  Bake on 350 for 12-14 minutes, until just done.  Cool to room temperature before frosting.

For the icing, blend the cream cheese, butter, vanilla and strawberries together until smooth.  Add the powdered sugar and blend again until smooth.  Frost cupcakes generously.  I like to use a medium-sized scoop to put a scoop of icing on top of each cupcake, then spread it on top of the cupcake just a little bit.  It's the perfect amount of frosting.

Sunday, July 3, 2011

American Flag Cake

I started a tradition a few years ago of making a flag cake every July 4th.  I love the 4th of July.  If you would like to know more of why I love this uniquely-American holiday, you can read about it here.

Despite most of my kitchen utensils being in boxes and the general disarray of my house, tradition is tradition.  Life must go on.

And so I will share with you my flag cake.

I'm posting this on Sunday so you can run out and get the ingredients and make it on Monday just in time for your cookout on Monday evening.

No minute like the last minute.

So I copied Barefoot's idea and used blueberries for the blue (obviously) part of the flag and raspberries for the red stripes.  But I have used quartered strawberries for the red in the past while in a pinch.  And that worked fine.  Or you could use blue and red M&M's.  Yum.  Or you could divide the icing and turn some of it blue and some of it red.  The possibilities are endless. 

Basically, a cake with cream cheese icing cannot be ruined.  So use any kind of fruit/candy/colored icing you want.  As long as it's red and blue.  Because, after all, this is an American flag cake.

I like lemon cake because I like lemons.  And I like lemon and cream cheese together.  And lemon and raspberries together.  And I get bored with white cake.  But if you are boring, then by all means, just bake a basic white cake.

So take a white cake mix and put it in your mixing bowl.


And add two packages of instant lemon-flavored pudding mix.


And a cup of sour cream.

Oh, yeah.  We're going to have one moist cake here.


And a cup of oil.  Told you it was moist.

And four eggs.


And some flavorings.  A teaspoon of vanilla extract.  And a teaspoon of lemon extract.


Yes!  I finished the lemon extract!  One less thing I have to move.

Our motto this week is: If you can use it, we won't have to move it.

Catchy, I know.

I write sonnets in my spare time.

So now that all of the deliciousness from the pantry and refrigerator is in the mixing bowl, turn it on.

The mixer, that is.

And beat it for 30 seconds on low.  That way you won't slosh oil on your church clothes.

See how lumpy it still is?


Okay, now we're ready for medium-high speed.  Two minutes.

Look!  It's beautiful and smooth and creamy and falling back into the bowl in ribbons.


Perfect.

Spray a 9x13 baking dish with nonstick cooking spray.


And pour in the batter.


And bake it on 350 degrees for 25-30 minutes. 


That hole in the middle is where I stuck my knife to make sure the cake was done.  We want it to be just done when we take it out.  No dry cake for us.

Also, even though my cake was perfectly done, it still fell a little bit in the middle after it cooled.  I don't know why this happened or how to prevent it.  The only thing I can say is that cream cheese icing covers all imperfections.


Now for said cream cheese icing.

A block of cream cheese, powdered sugar, butter, and vanilla. 

Make sure the cream cheese and butter are at room temperature.  If these items are fresh from the refrigerator, you will say bad words while you make your icing.  And that's not a good idea since your 3-year-old is helping you decorate.


Um, yum.

Beat it up.  No lumps.


And spread it on the completely cooled cake.


And spread it evenly.

And don't miss the corners.  Corners are cake too!  Even if I refuse to eat corners, I'm sure someone out there loves them.

Now, for the flag.  Use a knife and score the areas for the blue patch and the stripes. 


Draft your 3-year-old to make the flag out of berries!


Beautiful.

Make sure yours looks just as perfect as mine does.


American Flag Cake

Cake:
1 18.25 oz. box white cake mix
2 3 oz. packages instant lemon pudding mix
1 cup oil
1 (8 oz.) cup sour cream
4 eggs
1/4 cup water
1 tsp vanilla extract
1 tsp lemon extract

Combine all ingredients in the bowl of a stand mixer.  Beat for 30 seconds on low speed, until the inredients are incorporated but still lumpy.  Scrape the bottom of the bowl well.  Turn the mixer on medium-high speed and beat for two minutes, stopping once to scrape the bottom of the bowl.

Pour into a greased 9x13 glass baking dish.  Bake on 350 degrees for 25-30 minutes, until a knife inserted in the middle comes out clean.  Cool completely.

Cream Cheese Icing:
8 oz. block cream cheese, softened
1/2 stick (4 T) butter, softened
1 lb. powered sugar
1 tsp vanilla

Beat ingredients together for icing for about a minute or until it is smooth and creamy and no lumps remain.  Spread on the cool cake.

2 half-pints of raspberries
1/2 cup blueberries

Using a knife, score the flag design in the icing.  Then fill in the stripes with raspberries and the blue area with blueberries.  This cake needs to be kept cold and it will keep for several days in the fridge.

Monday, June 27, 2011

Coconut Cake

It's Monday! 

I love Mondays.  A fresh start to the week.

And nothing says a fresh start to the week like a cake soaked in cream of coconut and sweetened condensed milk.


If you came here looking for a healthy way to start your week, you're barking up the wrong blog.
I'm aware that I might lose any remaining readers with this recipe.  But I'm willing to take the risk because you won't be able to stop yourself from making this Coconut Cake.  It's ridiculous.  It's rich and moist and absolutely delicious.  It keeps for days in the refrigerator.  Not that it will last for days, but in theory, it could keep for days in the fridge.  It's a box of cake mix again.  But I don't think you would be able to guess that when you taste it.

Take a box of white cake mix. 


Mix it up according to the package directions and pour it into a greased glass 9x13 baking dish. 

Follow the directions except for the baking time.  What is with baking times?  Either my oven is about 100 degrees hotter than it says or every baking time is simply too long.  Whatever the case may be, bake this cake for exactly 23 minutes. 

Take it out of the oven
and immediately poke holes in it -- all over it -- with a fork.  The cake is hot, mind you, so it will make a mess.  Some holes will be bigger than others.  The cake will tear in some places.


This is what it is supposed to do.  Everything is okay.  All is right in the world.  Well, except for the housing market.  But that's another issue entirely.

Why are we poking holes in our nice cake?  Glad you asked.


Shake a can of cream of coconut well and then crack it open.  It's a very random thing, I know.  It's on the aisle with the mixed drinks, in case you were wondering.  But we are making coconut cake here, after all, so we need some coconut.  Or at least some cream of coconut.  My sweet husband was unable to find a can of cream of coconut (the can is about 14 oz.), so he bought this nice bottle of cream of coconut. 


Same thing, different package.  And different size.  And different brand.  But really, it's just the same.  This bottle was about 21 oz., so I left some of it in the bottle as to not completely drown my cake.  I won't say I wasn't tempted to try it, though.  Double-negative.

Cream of coconut should come with a warning.  But since it doesn't, I'm pretty sure I have a legal duty to warn you: do not, under any circumstances, read the nutritional information on the back of the can.  You will go into shock, be unable to complete the preparations for the cake, and your life will be ruined.  So be warned: the consequences you will suffer from reading the can will be worse than actually eating the contents of the can.

Now then, moving on.

Pour the entire can over the hot cake. 

Are you there?  You're not reading the can, are you?

Good.  You heard me.  The whole can.  Over the cake.

Don't play favorites.  Soak the edges and corners just as well as the middle.

Is it empty?  Good.  Now destroy the evidence.  Immediately.

Are you back? 

Good, because we're not done. 

Crack open a can of sweetened condensed milk.  You know, like Eagle Brand.  However, on that note, this is one of those expensive name-brand ingredients where the store-brand is exactly the same and like half the price. 

Pour it over the cake. 


You heard me.  The whole can.  Over the cake.

You can read the nutritional facts for the sweetened condensed milk if you want to.  Because as bad as you think it sounds, it's not nearly as bad as cream of coconut.  (Evil laugh.)

Now we just let the cake soak in the ridiculousness we just poured on top.

When it's cooled to room temperature, we're ready to refrigerate it.  This cake needs to be chilled before Cool-Whipping it and serving it.  About four hours in the fridge is enough time for it to set up and become dense and thick and rich and everything it's supposed to be.

When you're ready to serve it, spread the Cool Whip on top.  I forgot to photograph this step.  But I'm sure you can imagine it.

Oh, and Aletta, just for you I've created a new category called "How to Use a Cake Mix."  Hope you enjoy. :)

And tomorrow, I promise to post a healthy and delicious recipe.  For real.

Coconut Cake

18 oz. box white cake mix, prepared according to package directions, adding 1 tsp almond extract to the eggs, oil, water and cake mix
14 oz. can cream of coconut (on the mixed drink aisle)
14 oz. can sweetened condensed milk (Eagle Brand)
8 oz. tub Cool Whip, thawed

Prepare the cake mix (adding the almond extract) according to the package directions.  Bake for the recommended time in a greased 9x13 baking dish.

Remove the cake from the oven and while the cake is hot, use a fork and poke holes all over it.  The cake will tear in some places and make holes, but that is just fine.  Immediately pour the cream of coconut all over the cake.  Now pour the sweetened condensed milk over the cake.

Let the cake sit at room temperature until completely cooled.  Cover it and refrigerate it until chilled, about 4 hours.  Before serving, spread the Cool Whip evenly on top.

Saturday, May 28, 2011

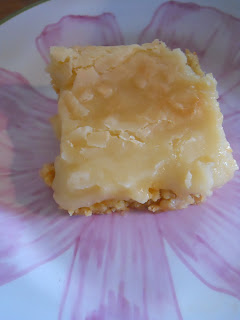
Ooey Gooey Butter Bars

Ooey Gooey Butter Bars.  Gooey Buttercake, if you're Pauler Deen.  I grew up calling it Chess Pie Squares.  This is my mom's recipe and it reminds me of my childhood.  My childhood doesn't seem like it was that long ago.  But I just turned 30, so I guess it was a long time ago.  Weird.

Anyway, whatever you want to call these yummy little squares is just fine.  It really won't matter what you call them at all, because you won't be able to stop eating them.

I've taken it to people when they had a baby.  I've taken it to Bible study many times.  (Aletta, this one's for you!)  I've taken it to friends' houses, to "pitch-ins" (for anyone south of the Mason-Dixon line, that's just a potluck), and pretty much any other excuse I could come up with to make this fabulous yet simple dessert.

If you're new to Ooey Gooey Butter Bars, it falls into the category of a bar cookie.  We'll make a crust and then top it with a cream cheese mixture and bake it all together.  Easy. 

The only way to mess this dessert up is to overcook it.  I find myself saying that a lot.  So, the truth is, when it comes to cooking and baking in general, don't overcook it.

There now.  Let's get going.

Take a box of yellow cake mix.  Betty knows best, so I buy Betty.  I stock up when they're $1/box at Kroger.  Have I mentioned how many ways you can use a box of cake mix and no one would ever know that you used a box of cake mix?

For the crust, we'll need a stick of butter and an egg to mix with the cake mix.


You can either use room-temperature butter or melted butter.  I've tried it both ways and it really makes no difference in the outcome.  Once again, this is a fool-proof recipe as long as you don't overbake it.

In a mixer with the paddle attachment, combine the cake mix, the egg, and the butter.

It's going to be stiff and very un-cake-like.  Rather, it will resemble a ball of stiff dough.  Like this:

Grease a 9x13 glass dish and put the crust in.  Considering that there is an entire stick of butter in the crust, I doubt the crust would stick to anything even if you wanted it to.  But I have a compulsion when it comes to greasing dishes that I'm going to bake in, so I spray it with some baking spray first.  But it's probably entirely unnecessary to do so.  But if you have issues like me, go ahead and grease your dish.  I can't believe I just wrote an entire paragraph about greasing your baking dish.  Moving on.

Okay, pat out the stiff dough into the bottom of the nicely greased dish.  No need to be perfect here.  Just make sure the crust is roughly the same thickness throughout.  But again, it just doesn't matter that much.  Because the only way to mess up this recipe is to overbake it.

Third time's a charm.

Here it is all patted out:

Those indentations are from my fingers.  I also ate a couple pinches of the dough, okay?  I love cake mix.

Now, take the same mixing bowl that you made the crust in.  Don't clean it out.  A few crust crumbs won't hurt the topping at all.  Because, as we all know by now, the only way to mess up this recipe...

I'm not going to say it again.

Into your dirty, crusty mixing bowl, put a block of room-temperature cream cheese, a pound of powdered sugar, two eggs, and a teaspoon of vanilla.  In case you buy your powdered sugar in 2-lb bags like I do, a pound of powdered sugar is roughly 4 cups.  But in the event that you don't use powdered sugar like I do, just buy a 1-lb. box.  It's easier than measuring it out because I inevitably manage to sprinkle it on my dog's back, who stands underneath my feet whenever I cook.

Use the same paddle attachment you used for the crust and beat the topping together.  It will be smooth and creamy, provided you follow instructions well and used room-temperature cream cheese.

Pour it over the crust.  Just like this.


Put it in a 350 degree oven for about 30 minutes.  35 minutes, tops.  Tops.  When you take it out, it won't be set so don't expect it to be.  Jiggle it a little.  It should still jiggle.  If you cook it until it's set, you will know that you broke the cardinal rule of this recipe.  And that would be a crying shame.

Take out your not-set-and-still-jiggly Ooey Gooey Butter Bars and let it cool on the counter.

My list of "How to Use a Boxed Cake Mix" is about 3.5 miles long, and this is at the top. 

When it's cool, cut it into squares and serve it to your friends.  They will follow you anywhere and do anything for you.

Just be sure to serve it on plates you got as a wedding gift becasue it's just special that way.  And this dessert, even though it's incredibly simple, is so special.

Ooey Gooey Butter Bars

1 box yellow cake mix
3 eggs, divided
1 stick of butter, either melted or at room temperature
1 8-oz package cream cheese, at room temperature
1 lb (or 4 cups) powdered sugar
1 tsp vanilla

Preheat your oven to 350 degrees.  Spray a 9x13 glass dish with nonstick cooking spray. 

Using a mixer, combine the cake mix, one egg, and the butter.  It will be a thick, stiff dough.  Press it into the bottom of the baking dish.

In the same mixing bowl, mix together the cream cheese, two eggs, powdered sugar and vanilla until it is creamy.  Pour it on top of the crust.

Bake 30-35 minutes.  It will still be jiggly when you take it out of the oven.  Cool completely before cutting into squares and serving.