Tuesday, November 22, 2011

Roast Chicken with Lemon, Garlic and Thyme


Oh, how I love chicken.

Especially roasted chicken.  It's so moist and flavorful, and you can make awesome chicken stock with the carcass tomorrow.

And then you can put it into your freezer just like I did.  Money saved is money earned.  Or something like that.

PLUS, according to Bobby Flay, chicken stock is the key to Thanksgiving dinner.  Who knew.  And who am I to question an Iron Chef.

To get the chicken ready, you want to wash it first.  And then don't forget to pull out the goody bag (also known as "giblets," though that word makes me gag) from the inside of the chicken.  I've never opened the little goody bag, so I don't even know what's actually in there.  But I don't have to open it to know that it's gross.


I'd would like to know who thought it was a good idea to package the chicken's innards into a nice little package and stuff it back inside the bird.  Because I'm going to sue them.


My mom used to make my brother and I eat chicken liver before she would let us have our drumstick.  Even though I've never checked, I'm pretty sure that liver is one of the surprises inside of the chicken innards goody bag.  She's going to pay for that someday.


Do you see how the chicken leg and thigh is literally falling off of the bird?  All I did was poke in between there with a knife to see if the juices ran clear, and the whole thing fell apart.


That's exactly what should happen.  We're talking tender to the point of ridiculous.


Roast Chicken with Lemon, Garlic and Thyme

4-5 pound chicken, washed and giblets removed

2 lemons, quartered
1 head of garlic, sliced in half

1 onion, cut into eights
1 lb baby carrots
2 T butter

1 T salt
2 tsp pepper
1/2 tsp dried thyme (or 6 sprigs of fresh thyme)


Place the chicken in a large baking dish or roasting pan.  Stuff the lemons and garlic inside of the chicken.  Place the onions and carrots around the chicken.  Brush or pour the butter on top of the bird, pouring any extra butter over the vegetables.  Sprinkle the salt, pepper and thyme over the chicken and the vegetables.

Roast in a 400 degree oven for about an hour and 15 minutes, until the chicken is cooked through.  Stir the vegetables several times while they roast.  You can test the chicken with a thermometer (you want the thickest part of the chicken breast to register 160 degrees as it will continue to cook when you remove it from the oven) or you can cut between the leg and the breast and when the juices run clear and the chicken is fall-apart tender, you're good to go.

Chicken Tetrazzini

Hands down, this is on my husband's top-five favorite meals.

It's very good and really easy.  Once you get the ingredients together, you just throw them all in the pot with the (drained) pasta, and mix it up.  Put it in a casserole, top it with cheese, bake, and there you have it.  Dinner.

You want to start by cooking the pasta.  While it's going, saute the mushrooms in some butter.


Once you cook the pasta, drain it and return it to the pot.  Now start pouring stuff in.


So far we've got the mushrooms, some chopped cooked chicken, chicken stock, and parm.


Now we're going to add all the creamy stuff:


Stir it all up.


This makes a lot of casserole, so I always make one to bake and one to freeze.


And I forgot to photo the baked one, because it was eaten too quickly to get a shot.  Trust me, it was good.

You can also make this with leftover turkey!  Just a little Thanksgiving tip for you.  More turkey day recipes tomorrow.

Chicken Tetrazzini
Adapted from Southern Living

1 pound vermicelli, cooked according to package directions, drained and returned to pot
1 cup liquid (like white wine, chicken stock, milk or half-and-half)
4 cups chopped or shredded cooked chicken (about 3-4 breasts)
10 oz. can cream of mushroom soup
10 oz. can cream of celery soup
10 oz. cream of chicken soup
1 cup grated Parmesan cheese
1 cup sour cream
1/2 tsp salt
2 tsp pepper
2 T butter
8 oz. mushrooms, sliced
3 cups (12 oz.) cheddar cheese, grated

While the pasta cooks, saute the mushrooms in the 2 tablespoons of butter for about 10 minutes, until soft and browned.  Set aside.

Return the cooked and drained pasta to the pot.  Add the chicken stock (or other liquid) to the pasta and stir to coat.  Add the remaining ingredients, except for the cheddar cheese.  Stir well to combine.  Grease two 3-quart casserole dishes (or one large dish) and pour in the pasta mixture.  Top with the cheese and bake in a 350 degree oven for 45 minutes or until very bubbly.

If you freeze one casserole like I did, just cover it well with foil (I usually wrap the entire dish in foil) and it will keep in the freezer for a couple of months.  When you are ready to bake, thaw it and bake it as directed.

Thursday, November 17, 2011

Tomato Bisque


There's this tea room in Lexington called the Greentree Tea Room.  It's very old-fashioned, very traditional and of course, very Southern.


And every December, they have Tomato Bisque on the menu.  It's the best stuff I've ever had in a bowl.  If I'm ever asked to be on The Best Thing I Ever Ate, I'm totally picking this soup.  (Food Network?  Are you there?)


So, after our annual trek there last December, I spent the next three months of my life trying to copy the bisque.  My persistence paid off, and this is pretty darn close to what the Greentree serves.

And now you get to benefit from my obsession to replicate a bowl of soup.  I know I need help.

We'll start with some onions and garlic in butter.  What's new.


And then pour in some rice - a really really full 1/3 cup.


Okay, now add the flour, and stir it around.


Do you like my heart-shaped tablespoon?  Special, I know.  I found it in my things from storage.  And I really like it.

Okay, now dump in these things:


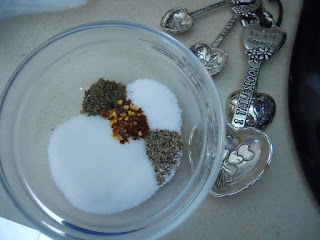
And some seasonings:


Here's what we have: salt, sugar, pepper, red pepper flakes, and thyme.

Cover it and let it simmer for awhile.  You want the rice to actually be overcooked.  It needs to be super plump and soft - this is not the place for al dente.


Okay, then.  Time to take this soup from a regular tomato and rice soup to a rich and delicious tomato bisque.

Here's what we're going to add:

And:

home-grown pesto.


Stir it all together, make sure it's hot, and you're done.


Yum, y'all.


Some homemade garlic croutons would be super yummy on top.  But the soup by itself is really out of this world.

If I do say so myself.

Tomato Bisque
Inspired by the Greentree Tea Room


2 T butter
2 onions, diced very small
4 garlic cloves, minced
2 T flour
Heaping 1/3 cup rice, uncooked
2 1/2 cups chicken stock
28 oz. crushed tomatoes
1 tsp salt
1/2 tsp pepper
1/4 tsp red pepper flakes
1/2 tsp dried thyme
2 T sugar
2 cups half-and-half
2 T pesto


Melt the butter in a large pot.  Add the onions and saute over medium heat until very tender, about 15 minutes.  Stir them frequently so they don't brown.  Add the garlic and saute for another minute.  Add the flour and rice and stir to incorporate.  Stir in the stock and crushed tomatoes.  Add the seasonings (salt, pepper, red pepper flakes, thyme and sugar).  Bring to a boil, reduce to a simmer, cover and cook for 40-45 minutes, stirring frequently so the rice does not stick to the bottom.  When the rice is very tender - even overcooked - add in the half-and-half and pesto.  Heat through and serve immediately.

Tuesday, November 15, 2011

Waldorf Salad with Pralines


Years ago, I had this Waldorf salad unlike any other Waldorf salad.  (Until that point, I think I had eaten one Waldorf salad.  But whatever.)


It was special because instead of just plain ol' pecans, it used pralines.  Yes, I know, my life is very exciting.


And since I've had nothing to do lately but unpack a whole house while entertaining two toddlers, I thought of that salad.


And then, since I have nothing to do, I ran multiple Google searches trying to find the recipe.  I'm pretty sure it was a Southern Living recipe (of course), but SL has let me down, because I cannot find it anywhere.


Just so you know, I did draw the line at flipping through the past nine years of my Southern Living cookbooks.  I have limits, you know.


I am the most inspired when I have the least time to concoct my inspirations.


So, after I wasted time searching for a recipe that apparently doesn't exist except in my imagination, I came up with this.

Hope you love it.  Because I did.  I ate the almost whole thing, so I guess I loved it.  Those things aren't always synonymous in my life.


Oh, and use the most gigantic bowl you own.  This makes a whole lot of Waldorf salad.


Waldorf Salad with Pralines


8 apples, chopped (I used an assortment of Honey Crisp, Granny Smith, and Red Delicious)
1 1/2 cups small-dice celery
2 cups red grapes, cut in half if they are large
3/4 cup raisins
10 oz. pecan pralines, roughly chopped

Dressing:

3/4 cup mayonnaise
3/4 cup plain nonfat yogurt
3 T honey
1/4 cup sugar
Juice from 1 lemon
Pinch of kosher salt

In a very large bowl, toss together the apples, celery, grapes and raisins.  Whisk together the mayonnaise, yogurt, honey, sugar, lemon juice, and salt.   Pour the dressing over the salad and mix well.  This is best if you refrigerate for at least a couple of hours to allow the flavors to blend.  Before serving, top with the pralines.  Serve chilled.

Monday, November 14, 2011

Chili

I've been painting the trim in my dining room.  AND I'M ABOUT TO GO CRAZY.

So I thought I'd take a break from painting and from destroying my house in a search for big sister's one missing Mary Jane (why couldn't she have lost one of her $9 Target tennis shoes?  Seriously.) to make chili.


Nothing says fall like chili.  And there's nothing I like better than a meal I can put sour cream and cheese on top of.

I make chili about five different ways.  This is one of them.  It's thick, hearty, spicy...you know you want to make this.

Anyway, here's what you want to do.  Chop an onion really small, and throw it into a pot with some ground beef.


It was at this point that I realized I had forgotten how to cook and my kitchen, while unpacked, is still new).  Actually, it's rather old.  But it's new to me. And I'm having a hard time remembering where I put everything.  Apparently I'm getting old too.

So glad I'm making new pathways in my brain.

Once the meat is browned and you drain off the excess grease (no need to clog our arteries with ground beef grease.  We're going to be doing plenty of artery-clogging with the butter on top of our cornbread), stir in the garlic and the three cans of tomato products.


I've inhaled too many paint fumes and put the beans in the picture instead of the diced tomatoes.  Oops.

Now add the seasonings.  I added two types of chili powder, simply because I got this Ancho chili powder:


here, at the DeKalb (pronounced DeCab, in case you're not from Georgia) County Farmer's Market and I wanted to try it out.


If you're ever in the Atlanta area or anywhere in the state of Georgia, for that matter, you must go to the DeKalb Farmers Market.  It defies any description I could give it.  I was tempted to move to Atlanta after my friend Bethany introduced me to the market.

Anyway, Ancho chili powder is a bit more bitter than regular chili powder, so I did one tablespoon of ancho and one tablespoon of the regular stuff I buy in bulk at Sam's.  Not quite as exciting as the farmer's market, but it worked.

Okay, now add a little water and let it simmer.  The flavors need time to meet, mingle, and marry.


How's that for alliteration.

Okay, now add the beans and sugar.


Now here's the weird part that makes this chili different:


Cornmeal mixed with water and cooked in the chili.  I stole the idea from Pioneer Woman.  It's different, and I like it.  It doesn't add a whole lot of flavor, but it's enough to make you wonder what's different about this chili.

I love subtle things like that.

Let this simmer away for another 20 minutes or so.


Yum.

Now top with cheese and sour cream.


I don't know where you're from, but where I'm from, cornbread is simply a must with chili.  Either whip up a box of Jiffy or make this yummy sweet cornbread.

Okay now.  Back to the trim in my dining room.

Chili


2 small or 1 large onion, diced small
1 1/2 to 2 pounds of ground beef (I like to use a higher fat content like 80/20 - better flavor)
6 cloves garlic, minced
10 oz. can Rotel
15 oz. can diced tomatoes
28 oz. crushed tomatoes
2 heaping tablespoons chili powder
2 heaping tablespoons cumin
2 tsp salt
1/2 tsp pepper
1 cup water
2 15 oz. cans kidney beans, drained and rinsed
2 T sugar
1/4 cup corn meal
1/3 cup hot water
Grated cheddar
Sour cream

Saute the onion and beef together in a large pot, breaking up the meat with a wooden spoon, until it is cooked through and no pink remains.  Drain the excess grease from the pot.  Return the pot to the stove and stir in the garlic, Rotel, diced tomatoes, crushed tomatoes, chili powder, cumin, salt, pepper and water.  Simmer for 25 minutes, stirring frequently.  Add the beans and sugar.  In a separate bowl, mix together the corn meal and the hot water and stir it into the chili.  Return to a simmer and cook for another 20 minutes.  Serve topped with cheese and sour cream.

Saturday, November 12, 2011

Oreo Truffles

I wasn't planning on posting a dessert today.  After all, I've been on a 2-week hiatus and it just seems a bit wrong to reappear with a dessert post.  And by wrong, I mean it's the only right thing to do.

But it is what it is, and if I'm going to post a dessert, this is a good one to post.  I made these for my aunt's birthday, and they're killer.  So I'm sharing them.


I don't know whose idea it was to throw a package of Oreos in a food processor with a block of cream cheese, but can you say genius?


Three-year-olds love to help with this.  They also prefer to eat the cookies than throw them into the food processor.  Just a warning.


Just about the time the mixture looks like potting soil, it's done.


Now, take a little tiny scoop (these puppies are rich!) and scoop the balls out onto a baking sheet lined with parchment paper.


You'll end up with 36 truffles if you do it right.  If you do it wrong, well...I don't know what will happen.


Refrigerate these for an hour.

Now cover them with white chocolate!


Oh yeah.


Some people actually dip the whole ball into the white chocolate, but I only make a mess doing that.  So I like to drizzle the chocolate over the top and let it run down the sides of the truffle.  It makes them looks woodsy and rustic.  Whatever that means.

Oh, and I don't know whose idea it was to call these "Reindeer Droppings," but that's just poor taste.  Pun intended.

If you don't make these today, definitely make these for Christmas.  Your family will give you nice presents if you do.

Oreo Truffles


1 16.6 oz. package regular Oreo cookies
8 oz. block cream cheese, softened to room temperature
12 oz. package of white chocolate chips

Place the cookies and cream cheese into the food processor and process until the cookies are crumbs and the mixture is completely combined.  It will look like a black mass.  Scoop the mixture into balls on a baking sheet lined with parchment or wax paper.  Refrigerate for an hour.

Melt the white chocolate according to the package directions.  Spoon the white chocolate over the truffles, making sure it drizzles down the sides of the truffles.

Refrigerate again until the chocolate is hard, about 15 minutes.  These keep well in the refrigerator.

Friday, November 4, 2011

Moving

Sorry for my absence.

I've been busy painting every square inch of our new house.

So I haven't cooked anything this week.  At all.  But I did drive through Panera and discover something new.

Well, new to me.  Probably not new to them.  But it was awesome nonetheless.  It was: the best bagel sandwich I've ever had.

That's the good thing about painting all day, every day.  I do things that I don't normally do.  Like drive through Panera.  For breakfast.


Next week I'll be back to normal.  Or at least that's what everyone around me is hoping.

And I'll have something better to post than a bagel sandwich from a drive-through window.

Even though it was delicious.  You should go get one ASAP.

But let me warn you: they stop serving them at 10:30 a.m. sharp.  And if you drive up at 10:35 a.m., they will not sell you a bagel sandwich.  And then you will be in a quandary, because who eats lunch at 10:35 in the morning???


I did.  But not because I wanted to.  Sigh.

See you next week.  From my new house.

Tuesday, November 1, 2011

Roasted Chicken Breasts

This is not the most exciting post in the world.

But it is necessary.

Because this really is the best way to cook an amazingly moist and tender chicken breast.  This is how I cook chicken for chicken salad, Curry Chicken, my creamy fettuccine casserole, and artichoke chicken, among other things.

Cooking chicken on the bone always gives better flavor and moister texture than cooking it any other way.  Plus, buying chicken on the bone is cheaper!  Awesome.

Just start with some bone-in, skin-on chicken breasts in a baking dish.


Sprinkle on some olive oil and some salt and pepper - and be generous with the salt and pepper!


And bake them in the oven for about 35 minutes.

And you'll get the most moist and delicious chicken ev-eh.


And likely you won't need the skin so you can eat the crispy chicken skin.  Yum.  I know that's why you're reading, because I give such great tips like: eat the crispy part of the chicken skin.


So try this for your recipe that calls for cooked chicken.  You'll be glad you did.

Roasted Chicken Breasts
Inspired by Ina Garten


Bone-in, skin-on chicken breasts
Olive oil
Kosher salt
Coarse-ground black pepper

Lay the chicken skin-side up in a single layer in a baking dish.  Drizzle on a little bit of olive oil and rub it on the skin.  Generously sprinkle salt and pepper on the chicken.  Bake in a 375 degree oven for 35-40 minutes until the chicken is cooked through.  When the chicken is cool enough to handle, you can pull it from the bone and chop it or shred it, depending what you recipe calls for.