Wednesday, February 27, 2013

Easy Lemon Curd

For the first time in my life, I doubted Southern Living.


I mean, I never doubt Southern Living.  That would just be wrong.


Southern Living is basically always right.  About recipes, anyway.  They have a whole slew of people that test recipes - over and over and over - before they're published.  It would be hard for them to go wrong.


But lemon curd in the microwave?

Come on.


No way.

I wanted to believe that it could work.  Really.  I did.  Because I love lemon curd.  But standing at the stove, stirring it, over low heat (so it doesn't curdle and ruin), for 15 minutes, is simply annoying.


So.  I tried the microwave method.


I'm a convert.  Totally.

The curd (could we think of a more appealing name to call it please?) is creamy, thick, smooth, simply perfect.  Everything you'd want your lemon curd to be.


Now I have a new problem.  This recipe is so easy that I'll be making lemon curd.  A lot.  It'll probably become a staple in my fridge, because it keeps for weeks.  And I love it with yogurt and fruit.


Or on a spoon.

Note: my only beef with Southern Living on this recipe is that it states that it will make 2 cups.  Mine yielded 3 3/4 cups.  Must just be a misprint, and too much lemon curd is never bad problem to have, though!

Easy Lemon Curd
Heavily adapted from Southern Living

1 stick (1/2 cup) butter, at room temperature
2 cups sugar
1 cup lemon juice (from 6-8 lemons)
2 T lemon zest (from 4-6 lemons)
4 eggs

In the bowl of a stand mixer, combine the butter and sugar.  Beat with the paddle attachment until the butter and sugar are a uniform mixture (this will take 1-2 minutes).  Add the eggs, one at a time, beating after each addition just until the egg is incorporated.  Turn the mixer to low and add the lemon juice and zest.  Scrape the bottom of the bowl to make sure the mixture is combined.  It will look curdled.

Transfer the mixture to a large microwave-safe bowl.  Microwave for 5 minutes, stirring at 1-minute intervals.

Microwave for an additional 2 minutes, stirring at 30-second intervals.  You'll know it's done when it coats the back of a wooden spoon, and when you draw a finger across the spoon, the curd "holds a line" (the curd won't run, but will be thick enough to hold the line).  Place a piece of plastic wrap directly on top of the curd to keep a skin from forming as it cools.  Place in the refrigerator and chill before serving.

Monday, February 18, 2013

Turtle Cookies

Oh, people.


It's Monday.

And I'm posting a cookie recipe.


What's new?

So here's the deal with these cookies.

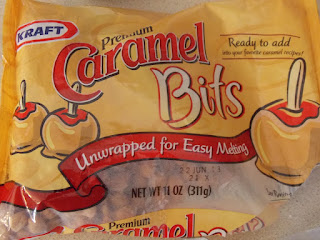
For the caramel, I used these caramel bits.  No mess, no unwrapping caramels.


Just little balls of caramel-y goodness.

Another thing: I added a bit of cream of tartar to keep the cookies from spreading too much.  Did you know that trick?  I just learned it.  Probably from Pinterest.  I really can't remember.


Enjoy these cookies.  We sure did.  And don't feel compelled to put pecans on all of the cookies...I didn't.  Sometimes you feel like a nut; sometimes you don't.


Turtle Cookies

1 1/2 sticks butter
3/4 cup packed brown sugar
3/4 cup sugar
2 eggs
2 tsp vanilla extract
1 tsp baking soda
1 tsp kosher salt
1/4 tsp cream of tartar
2 1/4 cups plus 2 T flour
2 1/2 cups semisweet chocolate chips
1 cup caramel bits
1/3 cup roughly chopped pecans

Cream the butter and both sugars in a mixer fitted with the paddle attachment until fluffy and creamy and completely incorporated.  (If your butter is cold, this will take a few minutes.)  Add the eggs and beat well.  Add the vanilla, baking soda, salt, cream of tartar and flour.  Pulse a few times to slightly incorporate but do not overmix.  Add the chocolate chips and caramel bits and finish combing with a spatula by hand.  Use a medium ice cream scoop to scoop these on a sheet tray. Press a few pecan pieces on the top of each cookie (if you want...or you can leave pecans out altogether).  Bake in a 350 degree oven for about 10-12 minutes. Cookies may look a little underdone when you take them out but will harden when they cool.

Friday, February 15, 2013

California Quinoa Salad

I just remembered that I still have a food blog.


I still cook, but I rarely remember to take pictures of what I make.  Or I make things like peanut butter and honey sandwiches, broccoli and bananas for dinner.

And I don't think anyone would come to see pictures of that dinner?

Maybe they would.  That might go viral.


I don't even know what I'm typing.  These days, I feel a deep sense of accomplishment when I make it all the way to rest time and the children have been fed and no one is injured.  And no one has colored on the rug I just got back from the dry cleaners.

And then I make it all the way to bed time and collapse from sheer exhaustion.  Please someone tell me you can relate.

On an unrelated note, my new hobby is pinning new recipes while Baby Bear nurses for an hour at bedtime.  He sleeps, eats, snuggles; I feed, snuggle, and Pin.  You know Pinterest?  We're the best of friends.

And Baby Bear and I?  We're a team.

And this salad was one of my finds during a marathon nursing session.  And when I finished, I came downstairs and made this salad.  It was really good.


A few things I need to tell you:
  1. It makes a ton.  Like, invite your whole neighborhood over.  Or just halve the recipe, like anyone with a brain would have done.  As previously stated, my brain only functions part of the time.  I made this entire recipe for myself during one of my non-functioning brain moments.
  2. It's really healthy.  There's no oil or cheese, and I didn't miss it.  That's saying something.
  3. There's crunch from the almonds, sweetness from the raisins and mango, just enough acid from the vinegar and limes, and bite from the onion.  And nuttiness from the quinoa.  Yum.
  4. I had never used balsamic and lime juice together.  I wasn't sure they "went."  They do.  They're good friends.
  5. I am in love with Trader Joe's sweetened shredded coconut.  I can't wait to go back and get another bag.  It's a little drier than regular coconut, and I really loved the texture.  And flavor.  And package.
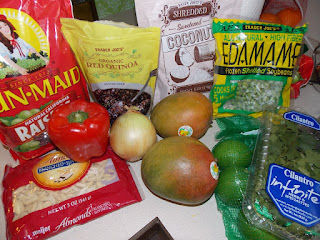
  6. On that note, I got all of the ingredients from Trader Joe's.  
  7. Basically, I just love Trader Joe's.  I think of it more like a field trip than a grocery store.
  8. This is ridiculously healthy.  You should be proud of me.
California Quinoa Salad
Adapted from Plant Strong

1 1/2 cups quinoa
3 cups water, for cooking quinoa
1/2 tsp salt
12 oz. bag frozen shelled edamame
1/4 cup balsamic vinegar
7 oz. sweetened shredded coconut
1 bunch cilantro, minced
2 fresh mangoes, diced
1 red bell pepper, diced
1 red or sweet onion, diced
1 1/2 cups raisins
5 oz. package slivered almonds, toasted (about a heaping cup)
Juice of 5-6 limes

Bring the water to a boil in a medium saucepan.  Rinse the quinoa and add it to the boiling water with the salt.  Reduce to a simmer and cook for about 15 minutes, until the water is absorbed.  During the last 5 minutes of cooking time, add the edamame to the pot and stir.  When the quinoa is cooked and the edamame defrosted, add the balsamic vinegar and stir.  Set it aside to cool to room temperature.

In a large bowl, stir together the remaining ingredients.  When the quinoa and edamame are cool, stir them in.  Serve at room temperature or chilled.

Wednesday, February 13, 2013

Italian Breakfast Casserole


If you don't know by now how much I love breakfast, then you must be new round these here parts.

I love it.  But the thing is, I rarely make breakfast food during actual breakfast time.  I usually am making brunch, lunch or supper when I cook breakfast.


Are you confused?

Anyway.  I often make breakfast for Sunday lunch, too.


Like, every week.

Good thing my family loves breakfast, too.


I guess our kids will grow up thinking that it's normal to have scrambled eggs for dinner, and waffles for lunch after church.

So this casserole is my take on the Bunny's Italian sausage casserole.  Except that I applied some important principles that my mom taught me: if it calls for cheese, double it.


I hope to pass the same values to my children.

You'll love this.  The crescent roll crust is so good.  This is a yummy casserole.

Italian Breakfast Casserole

8 oz. package crescent rolls (use the seamless sheets if you can)
1 lb. turkey sausage, cooked, crumbled and drained
8 oz. package shredded Mozzarella cheese
8 oz. package shredded Italian blend cheese
8 eggs
2 cups milk
1/2 tsp salt
1/2 tsp pepper
1/2 tsp dried oregano

Unroll the crescent roll in the bottom of a greased 9x13 baking dish.  Press the dough lightly, making sure that it reaches the corners and sides.  Sprinkle the cooked sausage on top, evenly distributing it.  Sprinkle the cheese on top.  Whisk together the eggs, milk, salt, pepper and oregano.  Pour it on top.

Bake in a 350 degree oven for about 25 minutes, until just set. If it starts to get too brown on top, cover it with foil until it is cooked through.

Monday, February 4, 2013

Turkey & Swiss Hawaiian Rolls


I'd like to know who thought this was a good idea.

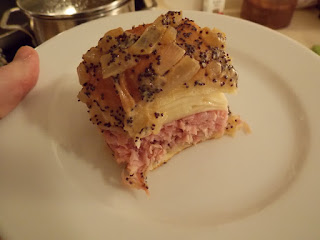
This, where you take Hawaiian rolls (like these.  Could eat the whole package.  By myself.)...


cut the whole package of rolls in half...


and smother the bottom half with a yummy mixture of butter, mustard, Worcestershire, poppy seeds and onion...


and then pile on turkey slices...


and Swiss cheese, of course...


put the top back on and pour the rest of the butter mixture on top!


Whew.

So I was saying, who thought this was a good idea.


Because it totally was.  I can't wait to make these again.

Turkey & Swiss Hawaiian Rolls

1 package of 12 Hawaiian rolls
8 oz. thinly sliced (or shaved) deli turkey
6 oz. thinly sliced (or grated) Swiss cheese
1 stick butter
2 T Dijon mustard
1 T brown sugar
1 tsp Worcestershire sauce
1 T poppy seeds
1 onion, minced

Cut the rolls in half across, leaving the individual rolls attached to each other.  Lay the bottom half in a greased 7x11 baking dish.

In a skillet over medium heat, combine the butter, Dijon, brown sugar, Worcestershire, poppy seeds and onion.  Cook for about 8-10 minutes, stirring often, until combined and onion begins to soften.

Spoon about 1/3 of the butter mixture on the bottom half of the rolls.  Layer the turkey and Swiss on top.  Place the top of the rolls on the sandwiches and pour the remaining butter mixture on top of the rolls.  Cover the entire dish with foil and bake in a 350 degree oven for about 30-40 minutes, or until the cheese is melted.

Friday, February 1, 2013

Lemon Tea Bread

This recipe is a case of semantics.


You see, some might call this cake.  I call it bread.


I mean, who says you can't drown bread in glaze, anyway?

That brings up the other issue.

I call this glaze.


My mom says it's icing.

Since you put icing on cake, and this is clearly bread, I call the white stuff glaze.

Are you with me?  Good.  Let's talk about this bread.


There are several things that make this bread so delicious.  And moist.  And lemony.

There's yogurt and oil in the batter.  So moist and yummy.


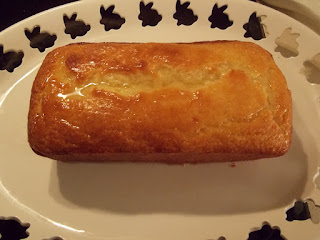
And then, when you take the bread out of the oven, you'll notice that it might look a little dry.  So you should definitely drench it in lemon syrup.


And then, when the syrup soaks in,


you cover it in glaze.  Or icing.  


It's just semantics.

Lemon Tea Bread
Adapted from Barefoot Contessa

1 1/2 cups flour
2 tsp baking powder
1/2 tsp salt
1 cup sugar
1 cup plain Greek yogurt (low-fat is fine)
2 large eggs
1/2 cup vegetable oil
1 tsp vanilla extract
1 tsp lemon extract

Syrup:
1/3 cup lemon juice
1/3 cup sugar

Glaze:
1 1/2 cups powdered sugar
2 T lemon juice
1 T canola oil

Whisk together the flour, baking powder, salt and sugar in a large bowl.  Add the yogurt, eggs, vegetable oil and extracts.  Whisk until just combined.  Pour into a greased loaf pan (I put a parchment paper sling in my pan to make it easy to remove).  Bake in a 350 degree oven for about 55 minutes, until a knife inserted comes out clean.

While the bread bakes, combine the sugar and lemon juice for the syrup in a small saucepan.  Cook over medium heat until sugar dissolves and the juice is clear.

In a separate bowl, whisk together the powdered sugar, oil and lemon juice to make the glaze.

When the bread is done, let it cool in the pan for about 15 minutes.  Run a knife along the edges of the pan to loosen the bread and turn it out of the pan and onto a piece of parchment paper (or wax paper).  Carefully and slowly pour the syrup over top of the bread, allowing it to soak in completely.

When the cake is completely cool, pour the glaze over the top, allowing it to drip over the sides of the bread.

You can cut this before the glaze hardens, but it will be a little messy.  Good luck waiting for it to cool, though!  It's so good!